Pages

Sunday, September 29, 2013

Winterland Village Tag Holder Gift Box

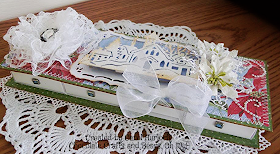
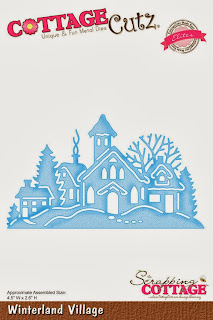
 Hello everyone and welcome to my CottageCutz Design Team project.  What I have here is a four matchbox drawer tag holder.  For the focal point, I used the Winterland Village Die, for the bottom lace, Fancy Lace Border, and for the accent under the pointsettia, Crystal Flurry Snowflake.
 The Winterland Village was distressed with Tea Dye Distress ink and then glitter with a pretty shiny glitter.
 The poinsettia are from the Michael's Dollar bin from last year.  I put a little extra stickles on them.  The Pearl bling is from Want2Scrap.
 This measures 9-3/4" x 3-1/2 inches.  For the top and bottom use some light chipboard such as cereal boxes to give a bit of strength to your project.  Be sure to cover both the bottom of the top cover and the bottom of the project.  This box was inspired by one that I pinned from this site.
 The drawers are filled with tags from the Homemade Christmas Giftset.  Here are the Gingerbread, distressed with Tea Dye Distress Ink and holding a little Recollection HoHoHo sign.  Aren't they cute!
 In this drawer there is a set of mittens with a little Holly accent.  The mittens were cut with red cardstock and then little scraps were cut again to make the cuffs.
 In this drawer are the snowman.  They have been accented with little Recollection Snowflakes.  The hats were cut with scrap black cardstock and adhered.
In this drawer are the sweet Christmas Trees.  They have a little seam binding bow tied at the top.  In each drawer there is a set of 4 tags, but it could easily fit more.
  Don't you think this would make a fantastic gift to a special friend.  Fill it with these adorable tags and she will love you for taking care of her gift wrapping needs.   The tags are housed in such a pretty container that can be used over and over again.  Thanks so much for viewing my project.  I really appreciate it.  See you soon.
Here are the dies used:


Tuesday, September 24, 2013

Colorless Mini Album Swap-My Scrap Room

 Hello Everyone!!!  Here is a project I want to share for the swap I did over at "My Scrap Room".  It was called a "Colorless" Mini Album.  We were to make an album 4 x 6 with six pieces of chipboard using only white, cream, tan, and beige along with tea dye distress ink and black ink for stamping.   My album is 4 x 6 x 4-yeah it is really thick and I made it twice trying to reduce the size of it-but no it came out thick too the second time.  Oh well, I have another mini for me.  I will show that one to you soon too.   The first photo is of the album cover.
 Here is the first and second page.  On the left is a page with a couple of tags and all metal embellishments are from Recollection.  On the right is one of my hand crocheted flowers with a bird die cut from CottageCutz.  I used the Martha Stewart Butterfly Punch Around the page for the photo mats.
 Page 3 & 4 is tag pockets using lace and a crochet flower.  The leaves are a CottageCutz die and so is that beautiful Birdcage on the tag on the right. 
 Page 5 and 6 are elements that open to hold photos.  The flowers are Prima and some that I won at the Crop at CKC in Jacksonville.  The wreath is a CottageCutz die.  The stamps are Cloud 9 and something I got a JoAnn's on clearance a while back.
 Page 7 & 8  include a little CottageCutz envelope that opens to include a little mini inside.  The photo mat on the right is spellbinders dies with "Want2Scrap bling.  There are a couple of Marvey Punch glittered hearts behind the crochet flower.
For page 9 & 10 I have another page that opens to place a couple photos inside.  The tags on the right are again the pretty CottageCutz Birdcage.  The doilies throughout are Cheery Lynn.  This was a blast to make.  I really enjoyed it and hope to do it again-just think how cool this would be for Halloween.  Thanks for visiting today.  Below is a video in case you want to see more of the album.  Please excuse the lens cap in the lower left hand corner.  I video recorded this at work so I could send the album off to my swappie and didn't notice the boo boo until it was too late.  Thanks for watching.  Happy Crafting.


Sunday, September 22, 2013

Sunflower, Smiles, and Sunshine

 There's lots here happening at Chocolate Crafts and Bears, Oh My!  I know,  I know, my blog has had post few and far between of late-it doesn't mean I haven't been crafting away.  As a matter of fact, I feel like a Scrapper on Steriods-I have done so many projects I haven't shared!!!! lol  Wait until you see what's been cooking.  I will be posting a bunch this week.
 I made this card for the "Queen for the Day" over at Splitcoast Stampers.  Trish had asked me to be the guest designer, so I couldn't refuse.  I love Sunflowers.  Gosh they are so pretty.  So I had colored this PSX stamp and had it ready to go for a card.  I cut and layered it three times.  I LOVE the dimension I was able to achieve.  I used stickles on the flower and glossy accents for the center.
 The butterflies are Martha Stewart along with the punch-around-the page design element.  The center is a Spellbinders die.  The lacy corners are a Cheery Lynn die.
Are you in fall mode?  I know I am.  I am putting up my fall/Halloween decorations and cleaning.  I haven't put my decorations up for about 4 years minimum I think.  I am always sick at this time with my Asthma.  I finally found out what is happening, how to control it, and am able to breath.  It feels great.  The doctor said that asthma is the only disease that people don't realize how sick they are.  They just learn to live with it.  Boy, when he said that, it described me to a "T".   So I will share some pictures of my vignettes soon too.  Happy Crafting!!!

Thursday, September 19, 2013

Homemade Christmas Gift Set-Gift Tag

Greetings everyone.  Today I want to share with you a tag I created for CottageCutz with the new Homemade Christmas Gift Set.  There is so much you can do with this set.  I have even more ideas on how to use this set that I will be sharing with you. 
Isn't this Merry Christmas Sentiment just precious!  I used some pretty lace and seam binding to decorate my tag along with some machine stitching and the Winter Frost Border that was painted with Rock Candy Crackle paint and sprinkled with glitter.
Here is a poinsettia made from the die in the Homemade Christmas Gift set.  The flower is layered three times, and sprinkled with glitter.  So fun to make this flower.  The Elegant Flurry Snowflake was also used on this tag.  It was placed under the poinsettia.  It so pretty and lacy you will want to use it on all your projects.
Thanks for stopping by today.  I really appreciate your visit.  I have so much to share with you.  In the next couple weeks I will have lots of post with projects.  I am putting the finishing touches on a swap item.  Happy Crafting friends!!!  Here are the dies I used:


Monday, September 9, 2013

CottageCutz Homemade Christmas Gift Tags

Hey everyone.  Here is another project using the dies from the CottageCutz Homemade Christmas gift set.  Wow, this gift set is so amazing with lots of different ways to use your dies from that set.  What I have here are some gift cards I made with the dies from this set.
This is the little snowman with the "joy" die cut. 
This is the mitten with the Dear Santa sentiment.
This is the Poinsettia with the Winter Branch Die
These little envelopes are the Elegant Envelope Die.  I just created a little 2-1/4" x 4-1/2" folded card on the inside to write "To" & "From" on.  These are so cute and fun to make.  Thanks for stopping by today.  Happy Crafting!  These are the dies I used:


Sunday, September 8, 2013

CottageCutz Pocket Watch Beary Christmas Ornament

Yipee, today is reveal day for a special release  called "Homemade Christmas Gift Set" from CottageCutz.   There are 21 universal dies and 7 clear stamps in this box giftset.   Isn't this bear just darling.  You know I love my bears.  I can't resist his sweet face.
 To create this Christmas Ornament, I started with Tim Holtz Pocket Watch Die.  I cut it out about 5 times to get the dimension.  I cut the center out of four of the dies and layered one on top of the other.
 I cut designer paper for the inside and outside of the watch.  I stamped the little postal image from the Cottage Cutz Christmas Gift Set in the center.  I just love that little stamp.  I know I will be using it a lot for all my Christmas crafting.
 Almost all the embellishments were made from the dies in this gift set.  There is just so much you can do with them.  The flower was cut out three times.  I used my McGill Flower shaping tool to created the Poinsettia.  The leaves are the Winter Pine Branch.  The snowflake edging is the Winter Snowflake Wreath.  I die cut the wreath twice and cut it to fit around the pocket watch.
 The chain is created using a Martha Steward Border punch.  I just cut it so it would be rounded to look like chain and twisted it and attached the bow at the end.
 The little bear was paper pieced and some chalk applied to brighten up his sweet checks.  I used a white pen for the highlights on his nose and eyes.  Here are the dies I used:


Be sure to visit the other CottageCutz DT members for their reveals:
Carol-that's me
Vladka
Olena
Simona
Cheryl
Kathy
Frances


SURPRISE!!!!  Please be sure to follow the link to The CottageCutz Blog.  Leave a comment all three days and you will be eligible for a prize drawing of a Gift Certificate to use to build up that CottageCutz Die collection of yours at The Scrapping Cottage.  So go now-don't delay and leave your comment!!!

Saturday, September 7, 2013

CottageCutz Homemade Christmas Gift Set 2

Hello everyone and welcome to CottageCutz by The Scrapping Cottage Sneak Peek Day 2.  This is the last Sneak Peek so be sure to come back tomorrow to seen the entire project.   We are super EXCITED to share with you projects using some of the CottageCutz dies and stamps from a special release  called "Homemade Christmas Gift Set".   There are 21 universal dies and 7 clear stamps in this box giftset.   I have to admit that when I opened this up I was totally WOWed by what is included. 

The release is tomorrow Sunday September 8th for the new Homemade Christmas Gift Set box.  On Sunday all designers will reveal the whole project for you.  You are just going to fall in love with these dies.

For more Sneak Peeks for day 2 be sure to visit the other CottageCutz DT members:
Carol-that's me
Vladka
Olena
Simona
Cheryl
Kathy
Frances

Thank you for joining us today for Sneak Peek Day 2 with the CottageCutz DT. Please be sure to join us tomorrow September 8 for the reveal!


SURPRISE!!!!  Please be sure to follow the link to The CottageCutz Blog.  Leave a comment all three days and you will be eligible for a prize drawing of a Gift Certificate to use to build up that CottageCutz Die collection of yours at The Scrapping Cottage.  So go now-don't delay and leave your comment!!!