Hello Friends and Crafters. Today's post is this lovely Candy Gift Box that is filled with embellishments. What a great gift for a crafty friend. If you check out my YouTube channel you will find a tutorial for this box. This is the link to the video: https://youtu.be/aQWuWgMOayU
Each candy box inside the gift box contains embellishments. Here are some gathered paper embellishments. Three fit nicely inside the box.
Another candy box contained these cute tiny tags perfect for tying onto gifts. The stickers used on the tags were a Hobby Lobby find.
For the third Candy Box these little embellishments were built on an oval nesting die with a shaker ticket on top. More Hobby Lobby Stickers were used to decorate. So cute to put these in your journals, scrapbooks or even decorate a gift.
The last box has been left empty to fill with candy. What a great way to gift a friend some cute embellishments. Remember you can make this in any theme. It doesn't have to be just Christmas. Thanks so much for dropping by. See you soon! Happy Crafting!
Todays project share is a Sewing Themed Birthday Happy Mail. The card that you see above ended up being a mini album....lol It was just so fun to make. It is three layers and very dimensional.
This is the second and third page. The second page has that cute Birthday Girl holding a card and the last page is a shaker Birthday Cake. There is room on the back of these pages to mount pictures. It's so adorable.
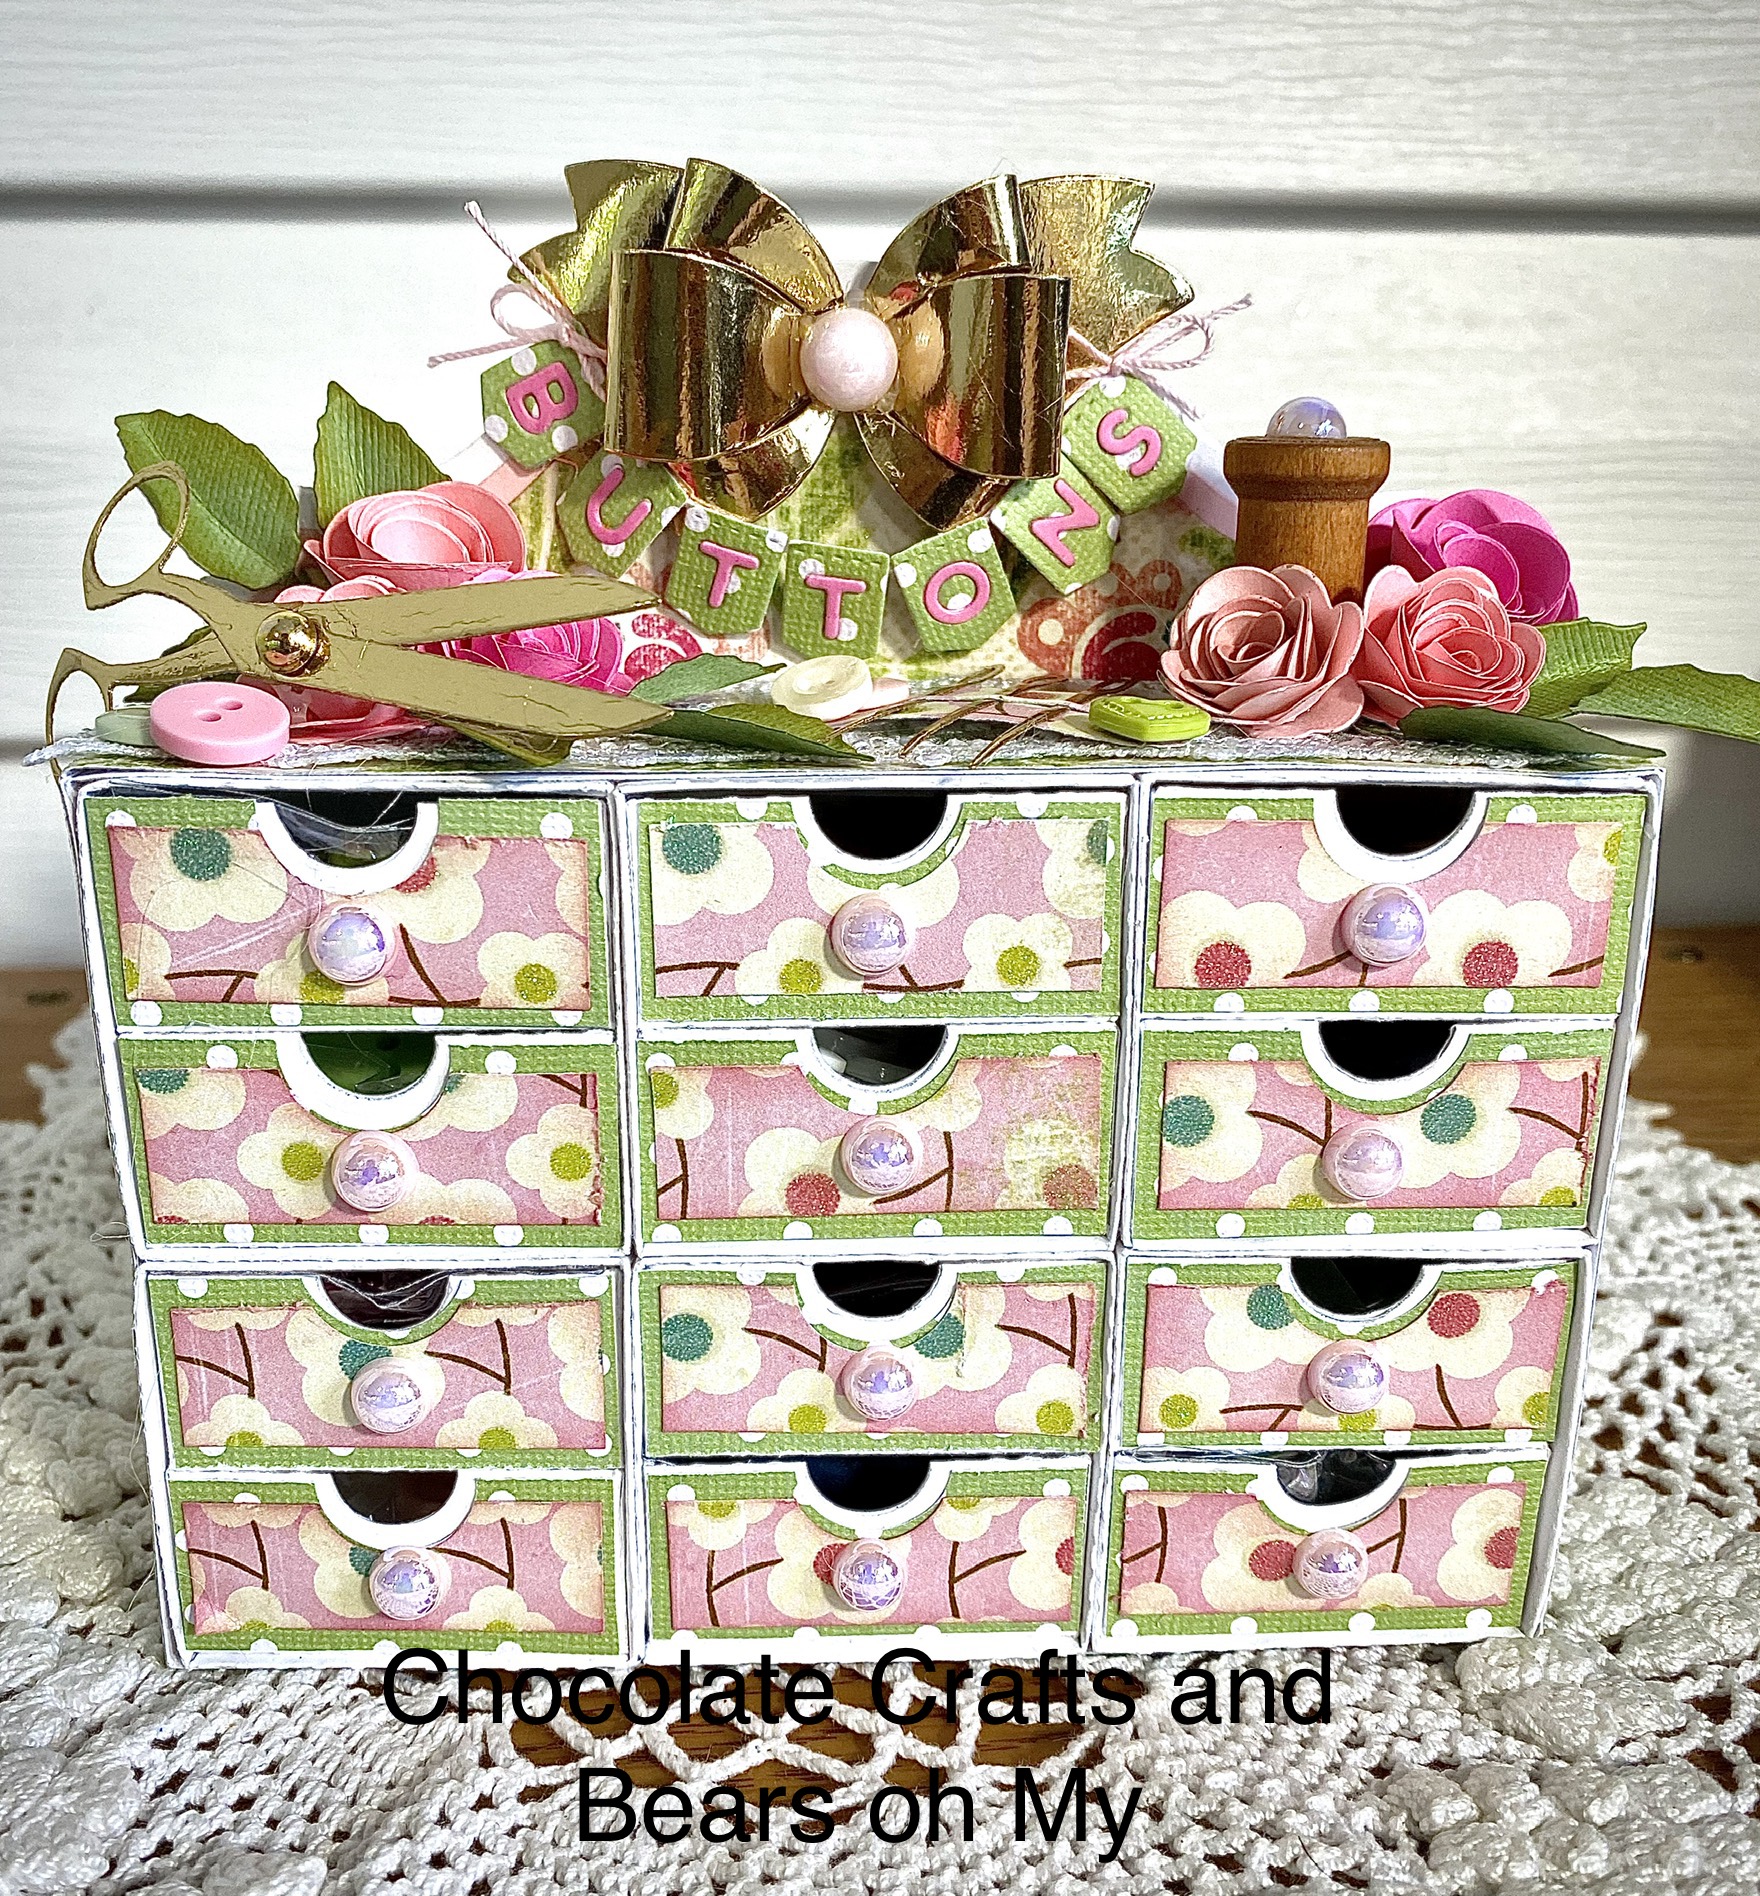
This is a button box that matches this set. It was filled with all types of shaped buttons.
This is a beautiful Sewing Machine Box. It is quite large. Kristieanne's Crafty Adventure on YouTube has a tutorial for this Sewing Machine. There are no dies or files needed. Just a scoreboard and paper cutter.
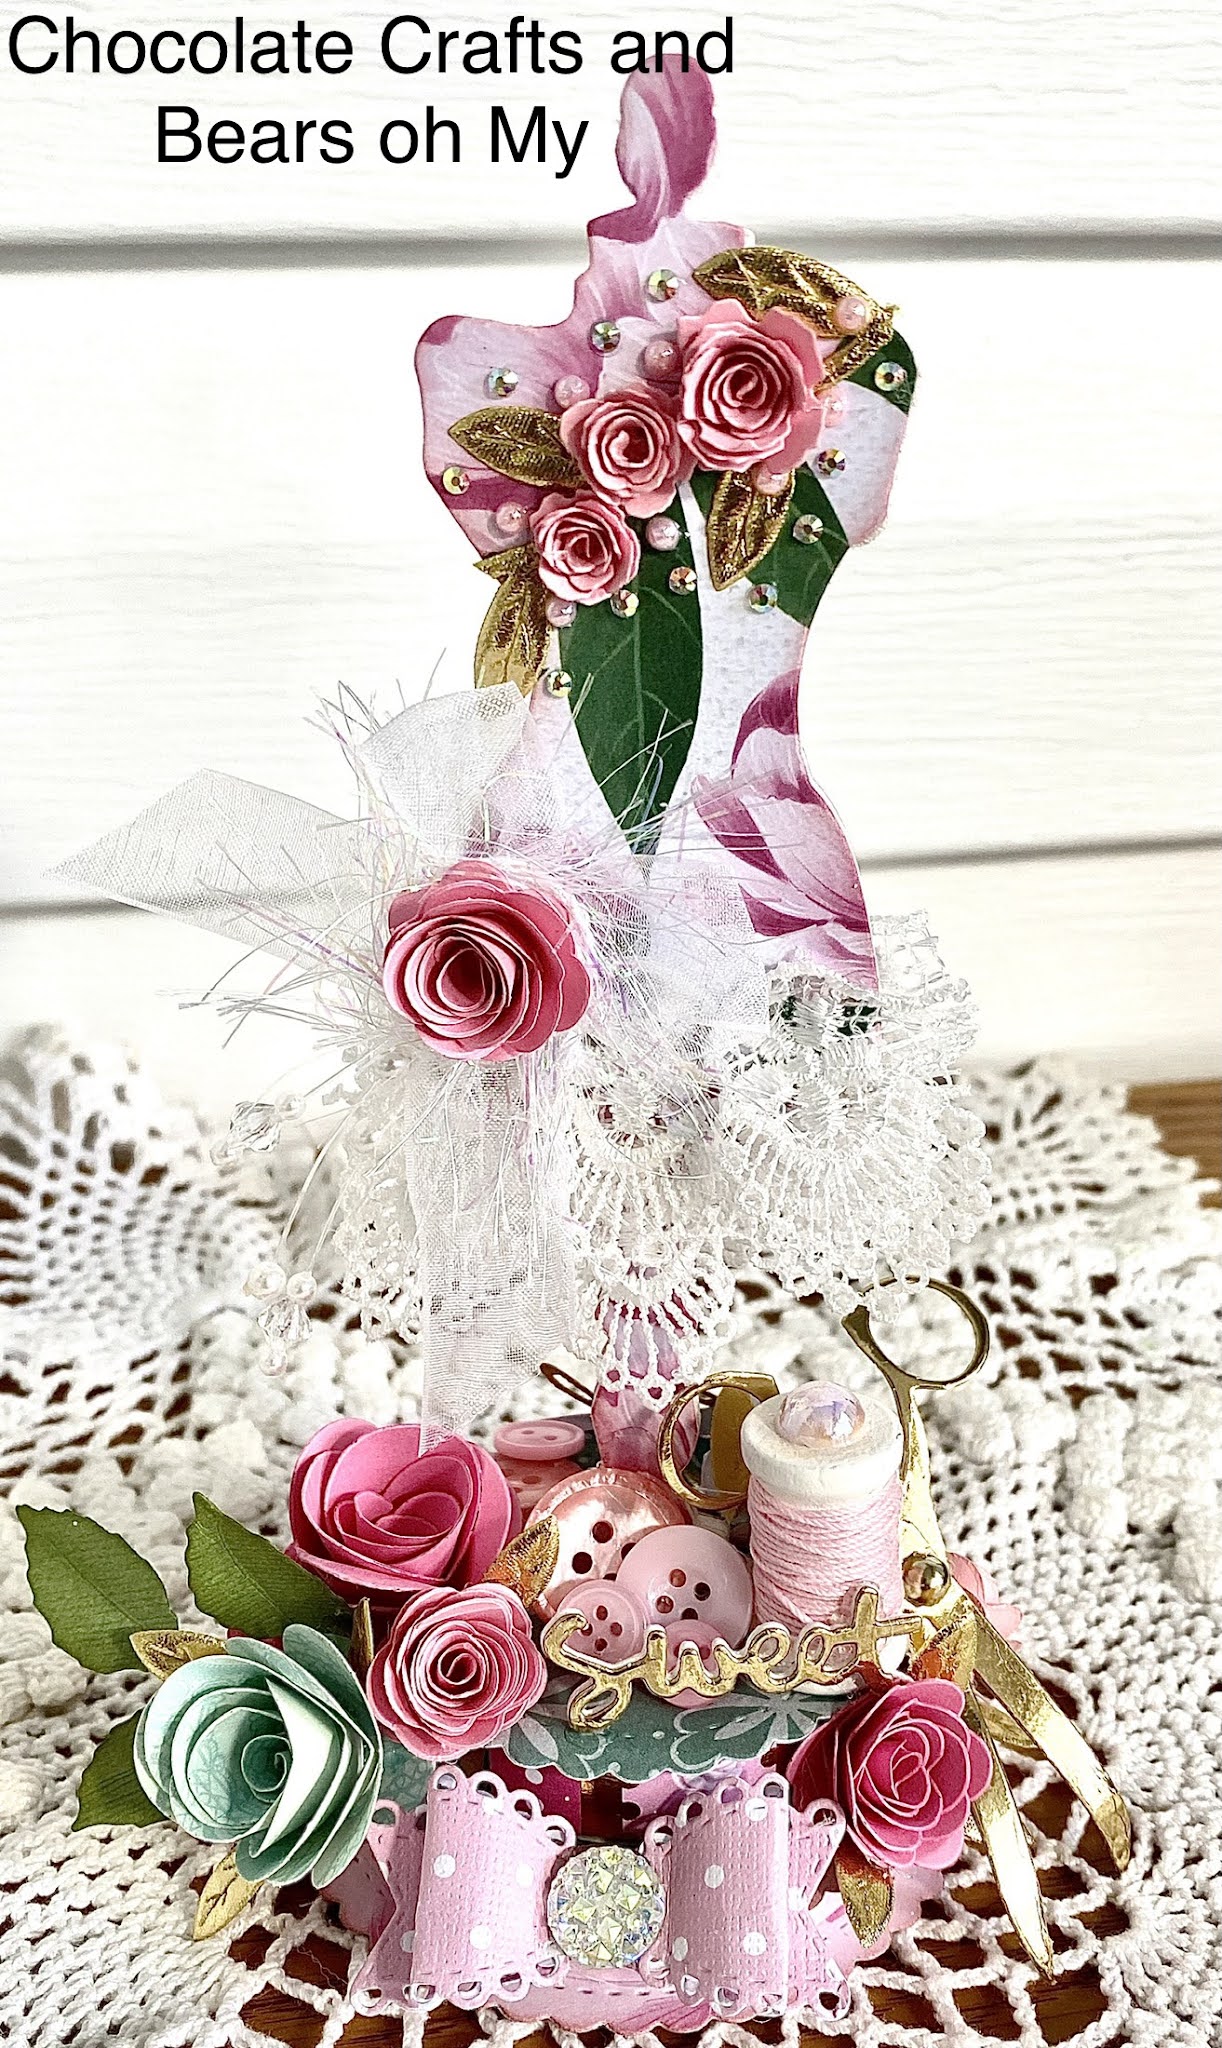
This project was inspired by Bona at Live, Love, Craft. It's a little notepad made from Sizzix Tim Holtz Dress Form Die.
Isn't this adorable. This is the Tonic Studios Cantilever Box Die with a bonus drawer that I created on the bottom. This was fun to fill with Flowers that I created.
This adorable Flip Top Box die is available on Aliexpress. It makes a perfect little gift box for tea or candy. Thank you so much for stopping by to view my projects today. I sure do appreciate it. Until Next time friends: Happy Crafting!
There's nothing like a sewing machine to grab my attention. This project can be found on Kristieanne's Craft Adventures on YouTube. You don't need any special dies or files to create it. Just a score board and a paper cutter.
After the first sewing machine was complete, my creativity kicked into gear and I started creating more "themed" sewing machines. This Paris themed Sewing Machine was born out of the love I have for Paris themed Projects.
When I was a little girl I remember my Mother sitting at a pedal foot sewing machine making dresses for me for school. My Mother was a good seamstress. When I was older, I followed in her footsteps and made my own clothes for about 10 years.
Of course, I knew I would have to do a Gorjuss Girl theme. I love these girls so much and just had to include them in the machines I made.
Another favorite theme of mine is "Bees" so here we have one in that theme with velum Sunflowers. This one makes me smile. Thank you sew much for stopping by today to view my projects. Until Next Time Friends......Happy Crafting!
Hello my friends and sweet bloggers. Today what I have to share is my Embellishments that I made for a swap at My Scrap Room. For the perimeters of the swap we were to create 4 Stick Pins, 2 Altered Bottle Caps, 4 Handmade Flowers, and 2 Altered Keys.
We were to make 3 sets of Embellishments and keep one set for ourselves. This is my second set. They are almost the same. Slight difference in the keys and the bottle caps. It was so much fun to create these embellishments that I actually made a few more than 3 sets.
Here are some of the stick pins I created. I love stick pins so I made a bunch of them to have on hand. I haven't made some for a while so I just played with my stash of beads and made these.
These are the stick pins I included in my swap package. I wanted to keep with a vintage shabby chic look in basic white colors so that they can be used in any project by my swap parteners.
Here are my Altered Bottle Caps. I purchased my bottle caps from Michael's and had a horrible time trying to flatten them in my cuttlebug. They didn't come out evenly so I need to try a different bottle cap next time. I really like these as embellishments and want to create more. I used some die cuts for the background on some and lace on others.
Here are the handmade flower for the swap. I crochet all the flowers and used lace and bits and piece of gold or white mesh for some of the flowers and eyelash lace for others. The centers are "Spare Parts" from Hobby Lobby.
These are the altered keys. My keys came from the $1 bin at Michaels. They are a pretty good size and would look stunning hanging from a mini album or as an embellishment on a mini album. This video has better close ups of all the embellishments and the packaging. Thank you so much for stopping by to see my project that I have been working on the last couple weeks. See you soon!
Well what to we have here? This is a swap I did over at My Scrap Room. It is my first Papercrafting Swap. We were to alter a bracelet box and make a charm dangle in either a Paris or Roaring 20's theme. My swap partner was Markisha and I asked her a couple of questions and found out "Chocolate" was her favorite color. So with that in mind, I went with it.
Granted I was only suppose to make an Altered Bracelet Box and Charm Dangle but once I started I couldn't stop-so I went all out. Above is an Easel Card I made. I love this image. I found it on the internet. I made all my own flowers either with the Spellbinders Bitsy Blossom die or a Marvey punch. Everything has been distressed with Rangers Brushed Corduroy.
Here is the actual Bracelet Box for the Swap. If you watch the video you can see the Charm Dangle inside and how I decorated the inside of the box. The Eiffel Tower is a CottageCutz die and I made it 3D. This image is also something I found on the internet.
When I purchased my Bracelet box it came with two other jewelry boxes so I just continued to alter them as I went along. I painted this box a nice deep rich chocolate brown. I used cheesecloth under my roses and stickled it with icicle stickles. See the CottageCut 3D mini Eiffle Tower....isn't it cute on this. The corner is a Cheery Lynn die. I believe I put some hand crochet flowers and a couple small crochet doilies inside this box.
Here we have another box that was in the set I purchased. By the way I got the 3 boxes at the dollar store in a package. I painted this with the rich brown paint. This image matches the Easel Card. I used a Tim Holtz rosette die and a paper doily on this. Again the little mini Eiffel tower in the lower left corner. This box contained some "Paris" themed chipboard pieces and a metal Fleur de Lis.
Believer it or not this is an altered box of Ferrero Rocher Chocolates! After all my swap partner said her favorite color was Chocolate....that's my kind of girl. I know this says Chocolate in french-exactly what else I am not sure....lol I used the CottageCutz Eiffel Tower on this and a couple rows of Martha Stewart Doily punch border.
This is an altered Glassine bag. It contains a French themed Prima Stamp set. I used the Martha Stewart Doily Border again, Cottage Cutz Eiffel Tower, Paper Doily and flowers and corner to match.
One last look at a few of the items and how they coordinated together. I had a blast making this. Markisha really loved it and I am just thrilled. I have included a video below if you would like to see what was inside the boxes and more details about the project.
Thank you so much for stopping by today. I hope you have enjoyed your visit. Guess what? I joined another swap!!! lol I have been working on that this past weekend. Fun Fun Fun. I will share with you soon the beautiful Bracelet Box and Charm Dangle I received from my partner. Probably in a couple of days.
Happy Crafting!!!!